
Besides the basic ability to delete, format, and create a new partition, the Windows Disk Management tool has advanced "Shrink Volume" and "Extend Volume" functions to help resize a disk partition without losing data. Both functions are easy to use, but many people report that "Extend Volume" is always grayed out even after shrinking another partition. This article explains why "Extend Volume" is greyed out in Windows 10 Disk Management and how to solve this problem easily. Find out the appropriate reason related to your own disk configuration and use the corresponding solution.
Reasons Why "Extend Volume" Is Greyed Out in Windows 10 Disk Management
Reason 1: No usable disk space
Before extending a volume, there must be usable space on the same disk (or RAID array); otherwise, a 250GB hard disk could be increased to 300GB. Of course, this is impossible for a physical component.
The usable space includes unused space in other partitions or unallocated space. Unused space cannot be transferred to other partitions directly; you should shrink it and convert part of the unused space to unallocated space first. If possible, you may also delete an allocated partition, and then all its disk space will be converted to unallocated space.
This means that "Extend Volume" is not workable if you do not shrink or delete another partition first.
Reason 2: Unallocated space is not adjacent and on the right
This is the most common reason why "Extend Volume" is greyed out.
When shrinking a volume, the only option for you is to enter an amount or click Shrink to use the default maximum available unused space. You cannot choose to create unallocated space to the left or right of this partition. Disk Management can only generate unallocated space on the right side of the shrunk partition.
This seems to not be a big problem, but "Extend Volume" can only merge adjacent unallocated space into the left partition. Shrink drive D and merge the unallocated space back into D again? This design is quite frustrating for users.
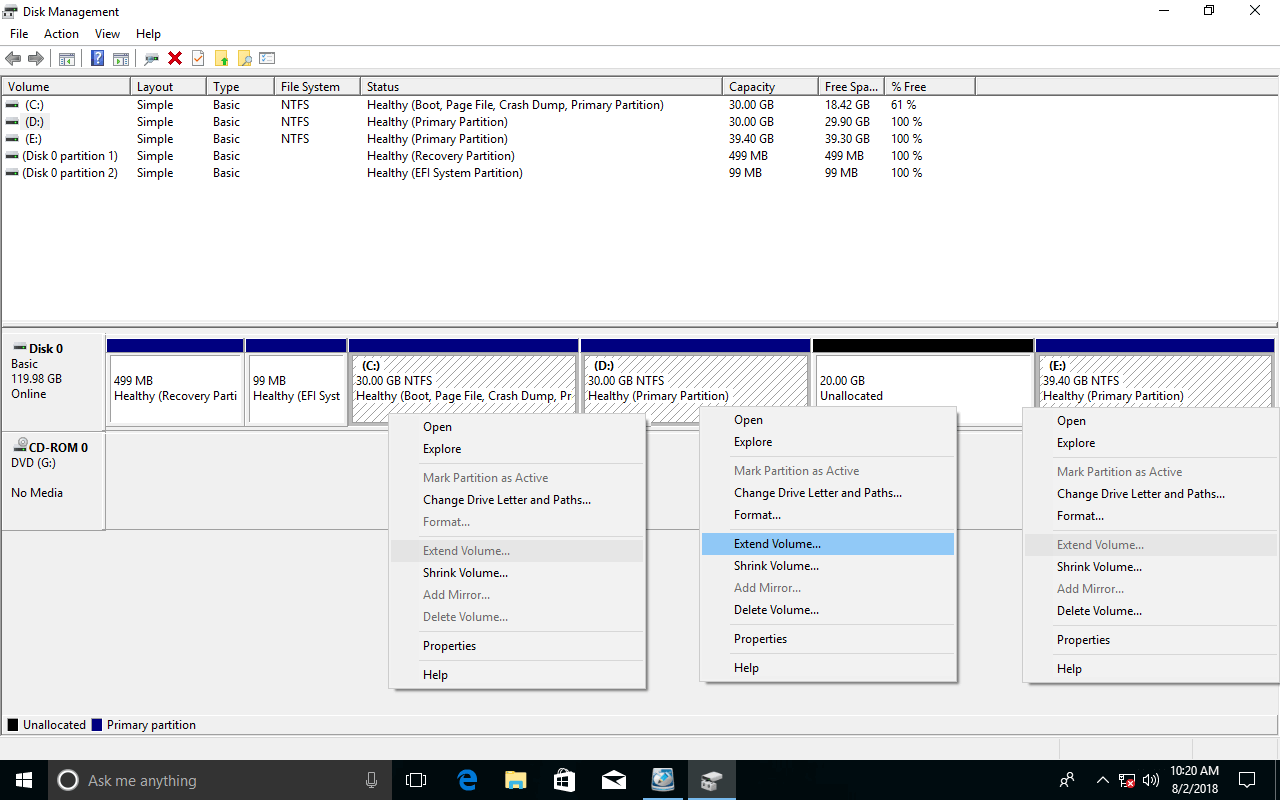
As seen in the screenshot, there is 20GB of unallocated space after shrinking the D drive.
When right-clicking the C: drive, "Extend Volume" is grayed out because the unallocated space is non-adjacent to it.
If "Shrink Volume" could create unallocated space on the left side, there would not be such an issue.
When right-clicking the E: drive, "Extend Volume" is also disabled because it is on the right side of the unallocated space.
If Disk Management could move unallocated space to the right side, this problem could be solved.
The only way to enable "Extend Volume" for drive C is by deleting the adjacent drive D. But for drive E, there is no way without third-party software.
Reason 3: Partition type is not supported
Both the "Shrink Volume" and "Extend Volume" functions only support partitions formatted as NTFS or without a file system (RAW). Thus, if you right-click a FAT32 or any other type of partition, "Extend Volume" will be grayed out.
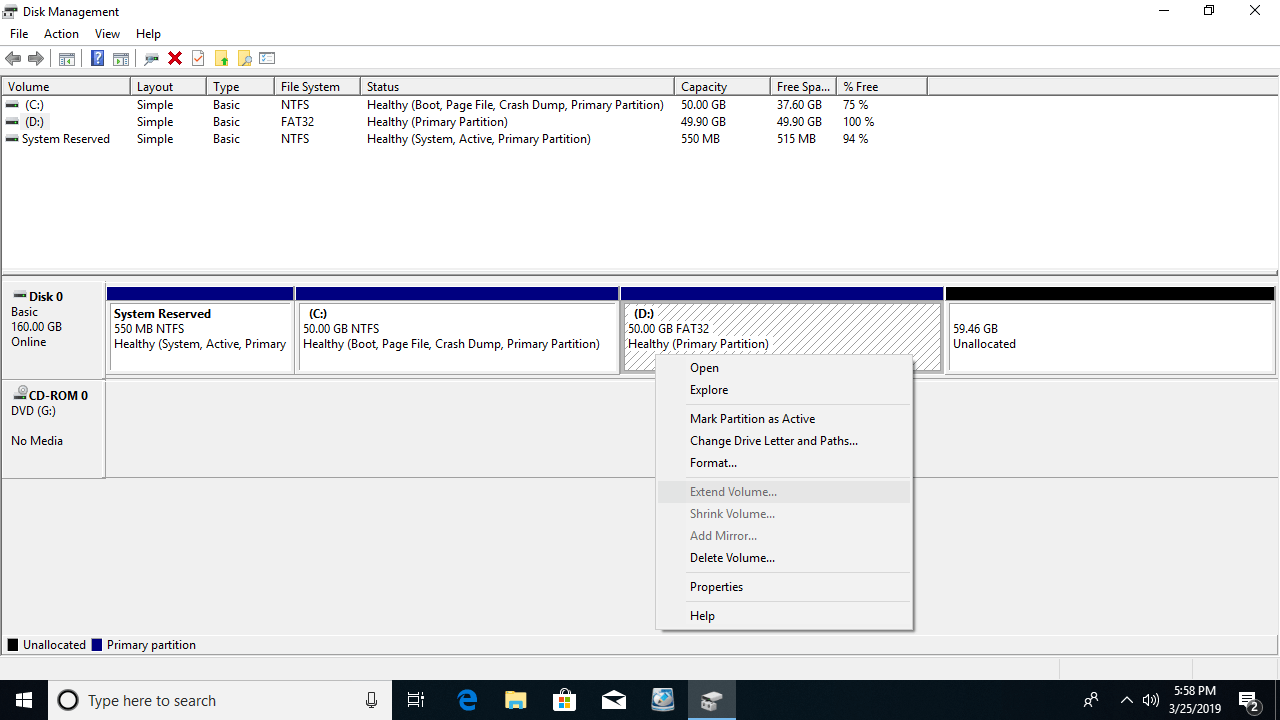
As an example, even if there is 59.46GB of unallocated space that is adjacent and on the right side, drive D is FAT32, so "Extend Volume" is greyed out.
Reason 4: Shortage of an MBR type disk
This issue only exists on an MBR disk; you may ignore this paragraph if you use a GPT disk.
To check the disk type: right-click the front of the disk (not a single partition) and select Properties, then switch to the Volumes tab in the pop-up window.
Unlike a GPT disk that creates all partitions as Primary, an MBR disk has both Primary and Logical partitions. If drive D is Logical, you cannot extend the C drive even by deleting D.
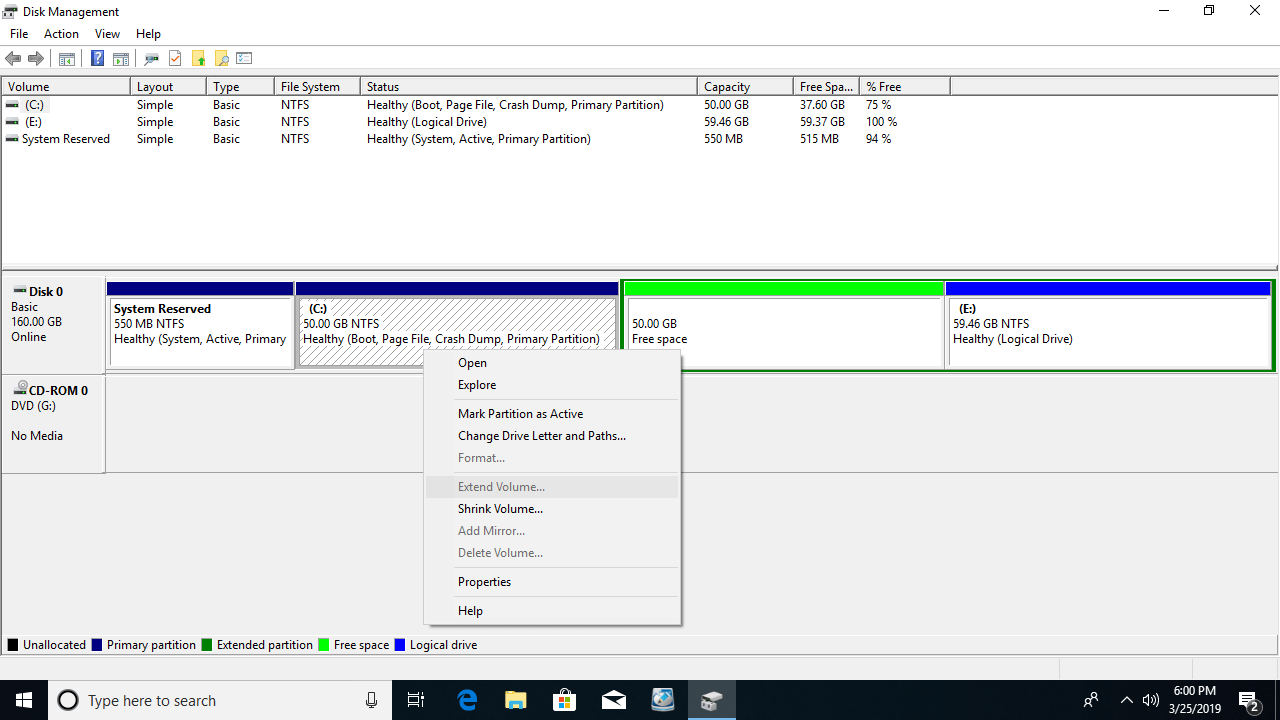
As you see, in my Disk 0, there are two Primary partitions: System Reserved and C. There are two Logical partition: D and E..
Extend Volume greyed out after deleting D.
If you take a good look at the screenshot, you'll find something different:
- After deleting, the disk space of the original D is not unallocated but "Free space".
- There is an Extended partition outside of the unallocated space and drive E.
In Disk Management, you cannot convert the "Free space" to unallocated space until you delete all other Logical partitions and the entire Extended partition.
Explanation:
The strategy to manage partitions on a GPT and MBR disk is different. There are only 4 entries in the master boot record sector on an MBR disk to locate partitions. These entries can only be assigned to Primary partitions and the Extended partition (if there is one). The fifth partition must be created as a Logical drive inside the Extended partition.
Unlike a Primary partition that works as an independent unit, a Logical partition is just a part of the Extended partition. So, after deleting a Logical drive, its space shows as Free, and this space cannot be merged into any Primary partition. Likewise, unallocated space generated by deleting a Primary partition cannot be merged into any single Logical drive.
What to Do When "Extend Volume" Is Grayed Out
It seems to be a bit complicated for users who are not familiar with hard disks and computers, but it is very easy to solve this problem. Here is the solution for the most common issue: "Extend Volume" greyed out for the C drive after shrinking D.
Download and install NIUBI Partition Editor.
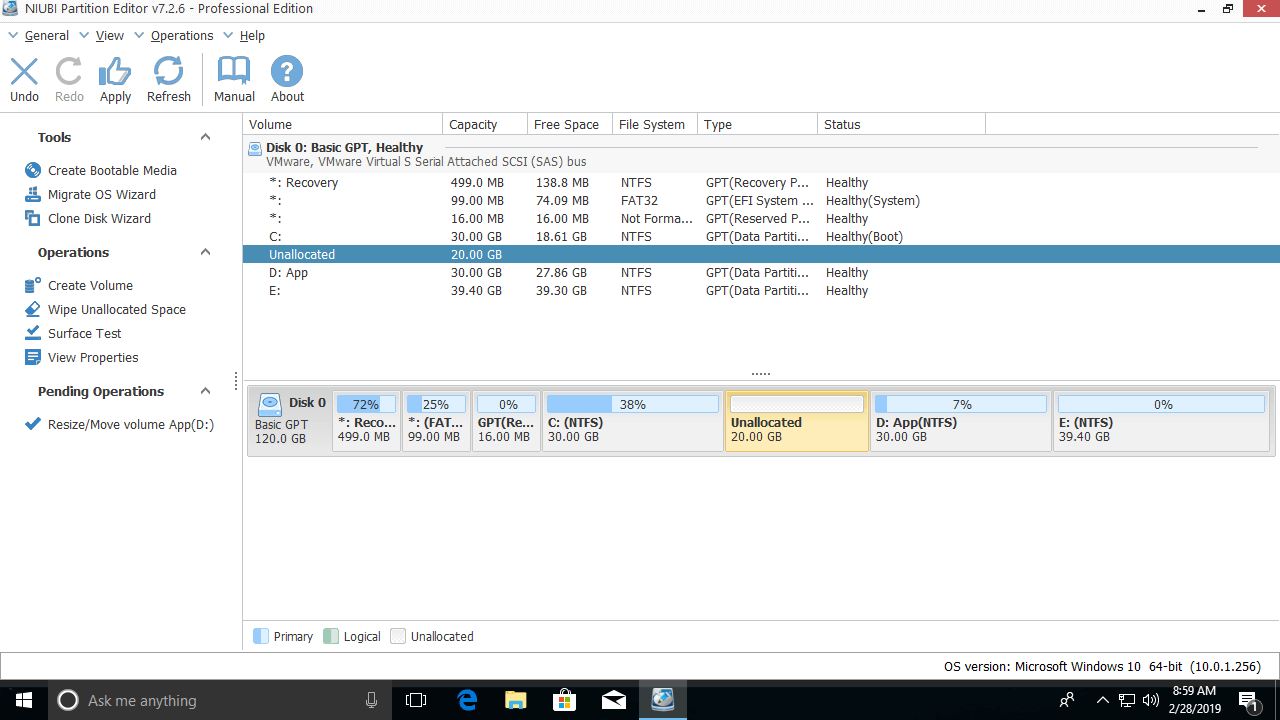
Step 1: Right-click drive D and select "Resize/Move Volume"; drag the middle of the D drive to the right in the pop-up window.
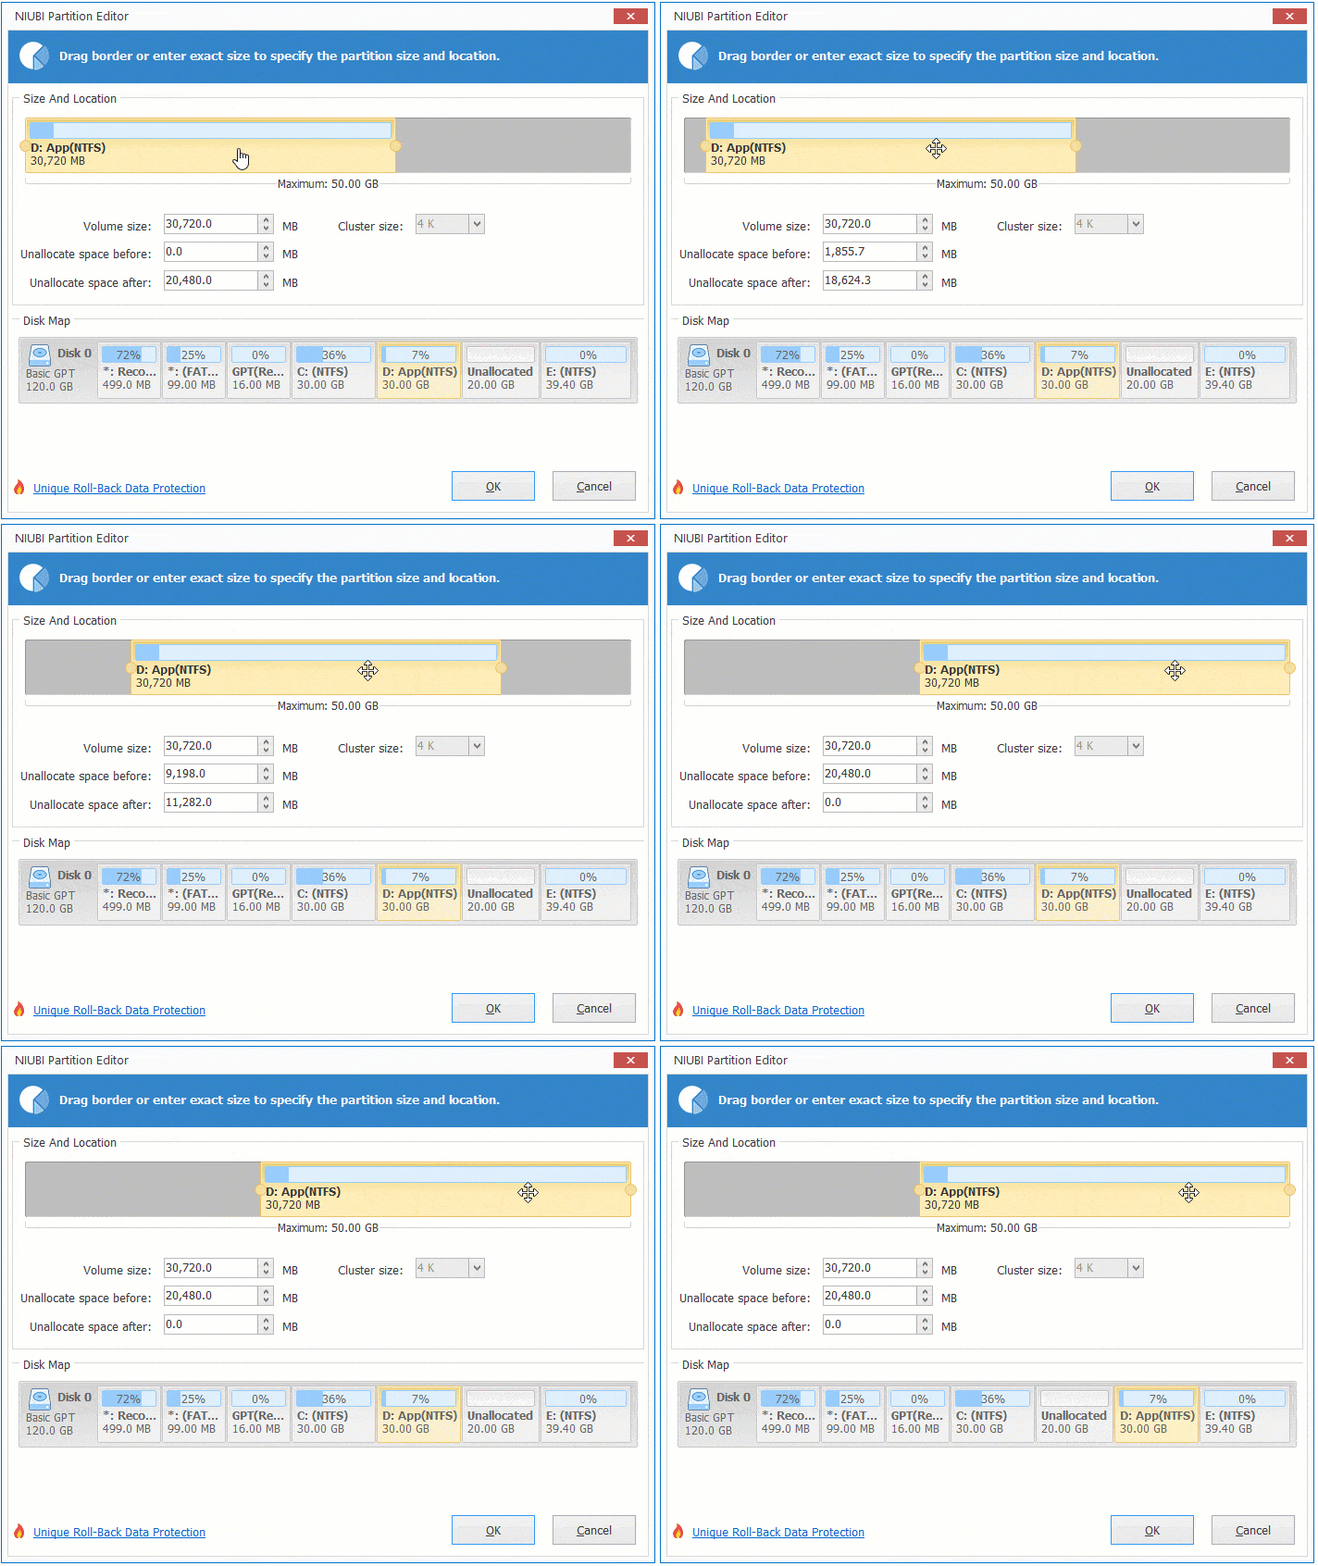
Then the unallocated space is moved from the right of D to the left side.
Step 2: Right-click drive C and select "Resize/Move Volume" again; drag the right border to the right in the pop-up window.
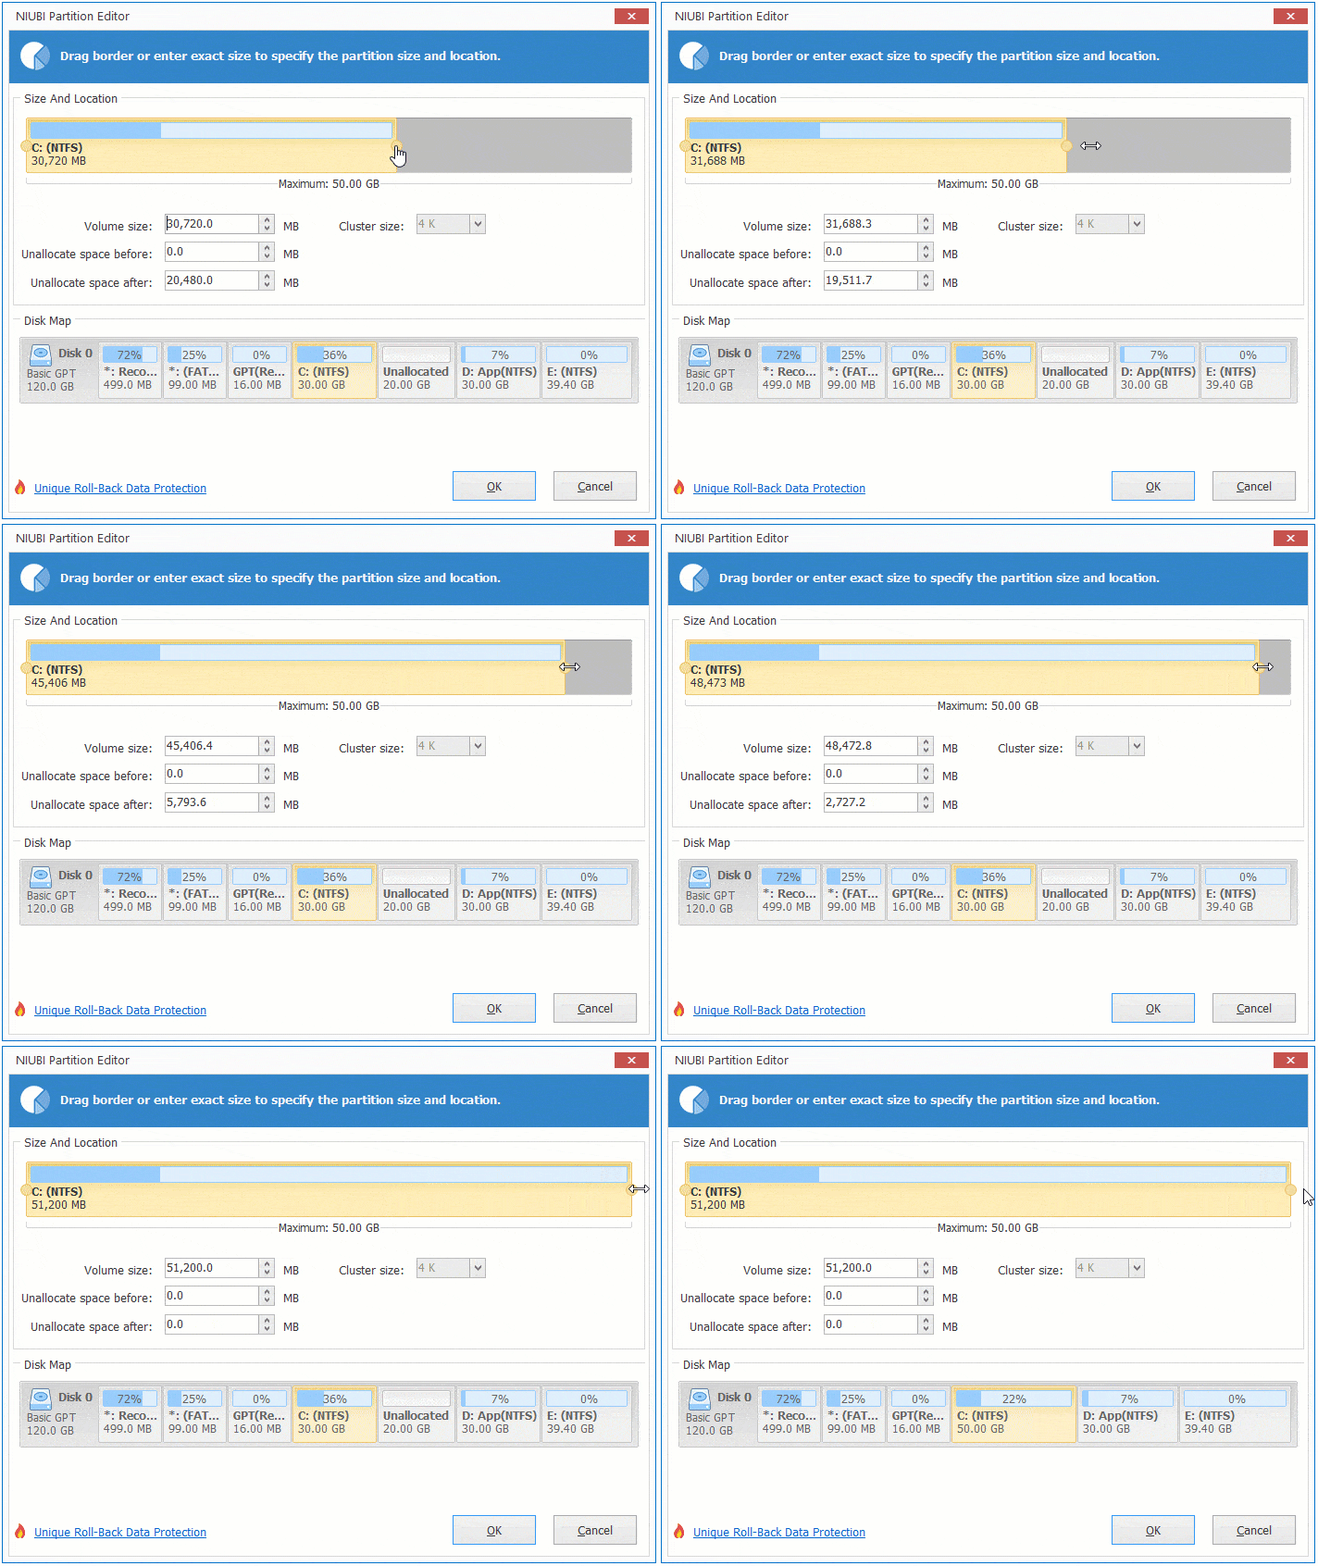
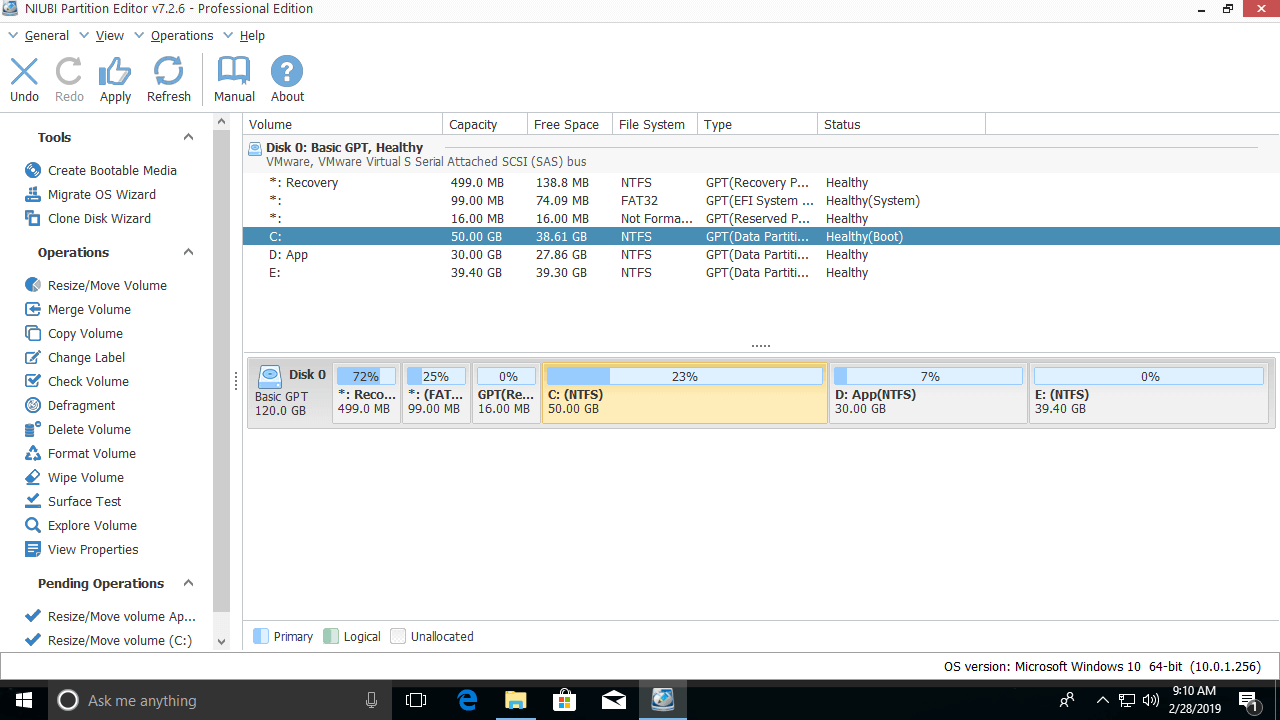
Then the unallocated space is merged into the system C drive.
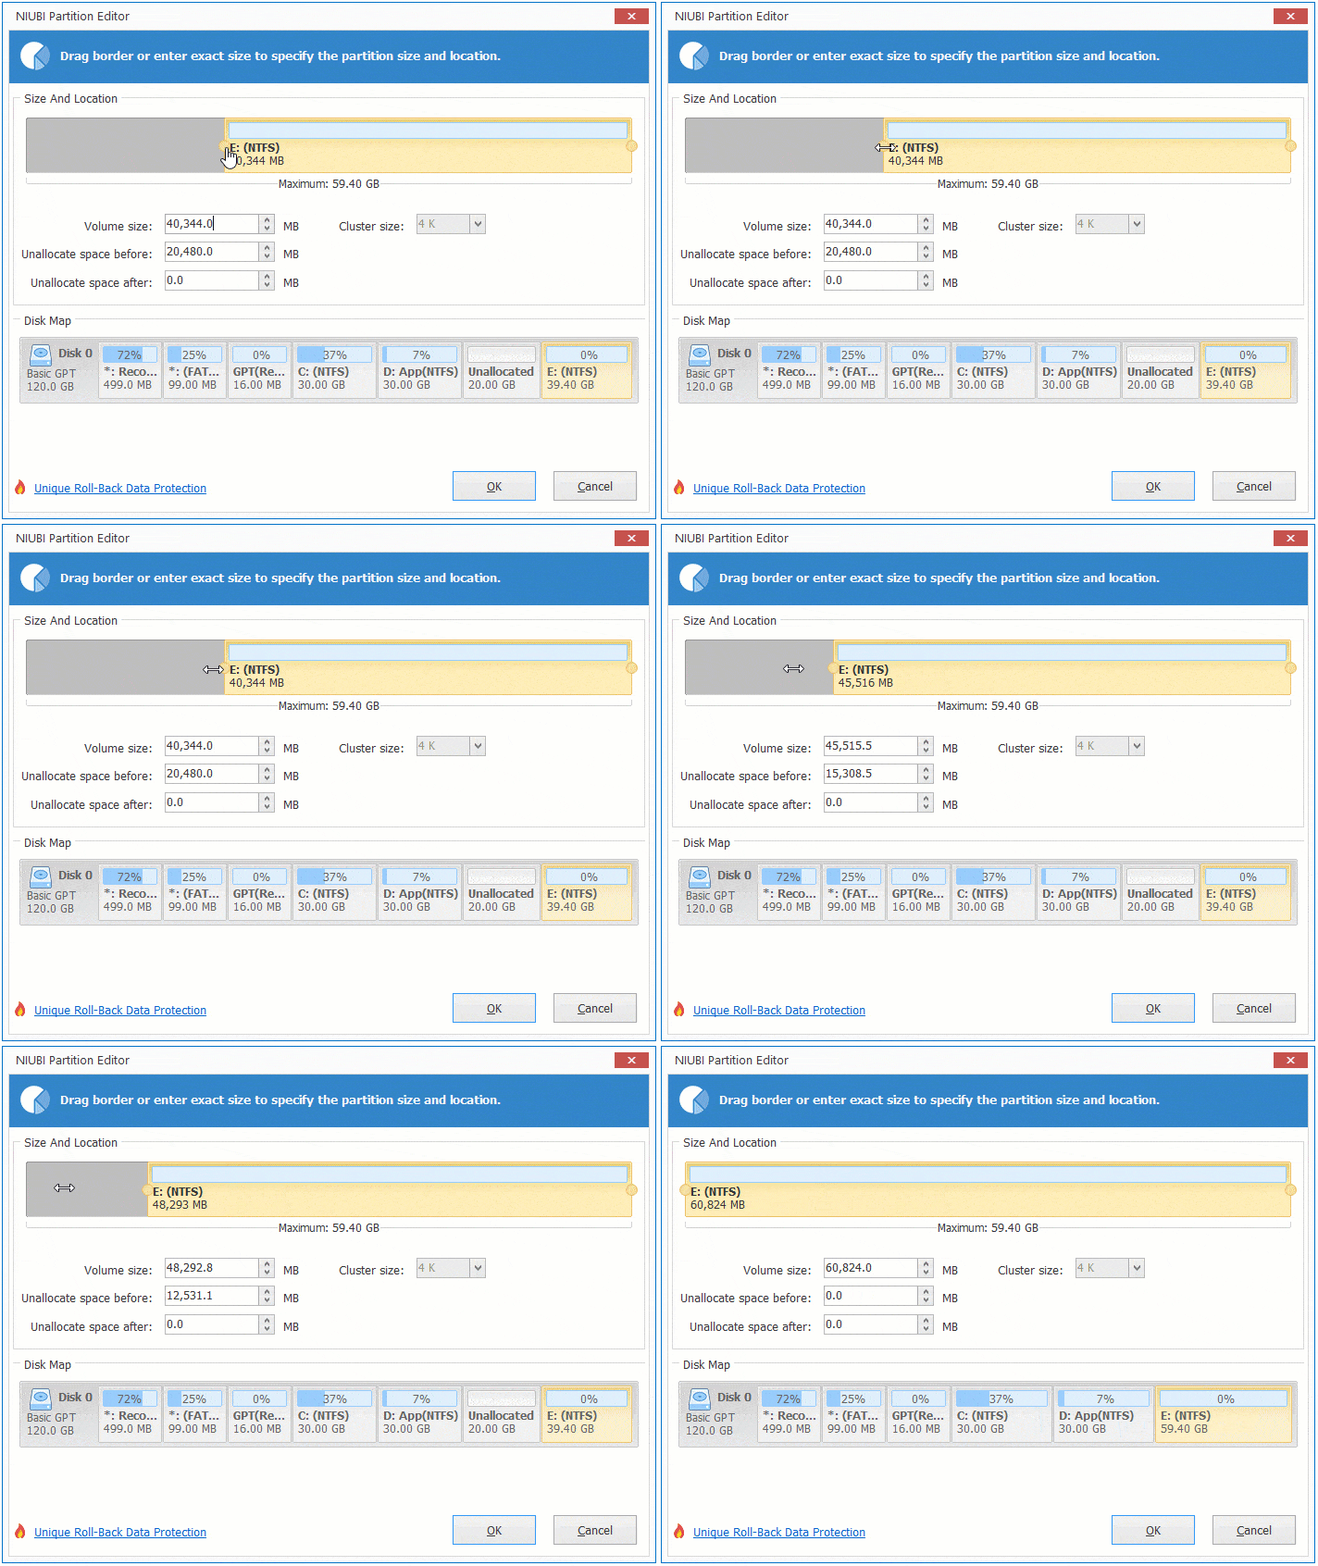
If you have shrunk drive D but cannot extend volume E in Disk Management, follow the steps below:
Run NIUBI, right-click E, and select "Resize/Move Volume".
Drag the left border to the left to merge the unallocated space directly.
If "Extend Volume" is greyed out because this partition is FAT32, or because of the limit between a Primary and Logical partition:
Simply right-click this partition and merge the adjacent unallocated space on either side with the "Resize/Move Volume" feature.
How to Extend a Volume to Another Disk
If there is no available free space on the same disk, NIUBI Partition Editor offers two options to extend a partition:
- Copy another partition to a different disk, delete the original partition, and then merge the unallocated space into the partition that you want to extend.
- Clone the disk to a larger one and extend the partition with the extra disk space.
Besides helping resolve the "Extend Volume" greyed-out issue in Windows 10/11 computers, NIUBI Partition Editor offers many other disk partition management functions. Compared to other tools, it features Virtual Mode, Cancel-at-Will, and 1-Second Rollback technologies to protect your system and data.
 © 2009 - NIUBI Technology All Rights Reserved. |